14 Certificate Auto Enrollment Policy

Certificate Auto Enrollment allows devices to enroll for certificates from Active Directory Certificate Services. Samba’s Certificate Auto Enrollment uses the certmonger service to keep track of certificates. It also uses the cepces plugin to certmonger.
14.1 Server Side Extension
The Server Side Extension (SSE) for Certificate Auto Enrollment is part of the Group Policy Management Editor (GPME). Currently, no samba-tool command is available for managing this policy. The policy requires access to a Windows certificate server. On the certificate server, the roles Certification Authority, Certificate Enrollment Policy Web Service, and Certificate Enrollment Web Service all must be installed and configured. Optionally the role Network Device Enrollment Service can be installed to simplify the fetching of the root certificate chain by the client. Configuring the certificate server is beyond the scope of this book.
Optionally, the Network Device Enrollment role can be configured on the server, which will allow the client to fetch the root certificate chain. Without this role, the Client Side Extension will report the following warnings:
[W26775]| Failed to fetch the root certificate chain. | {}
[W05621]| The Network Device Enrollment Service is either not
          installed or not configured. | {}
[W11946]| Installing the server certificate only. | {}
14.1.1 Managing Certificate Auto Enrollment via the GPME
To enable Certificate Auto Enrollment using the Group Policy Management Editor (GPME):
Open the Group Policy Management Editor. For instructions on accessing the GPME, see chapter 4 section 4.1.
In the Group Policy Management Editor window, navigate to
Computer Configuration > Policies > Windows Settings >Security Settings > Public Key Policies.
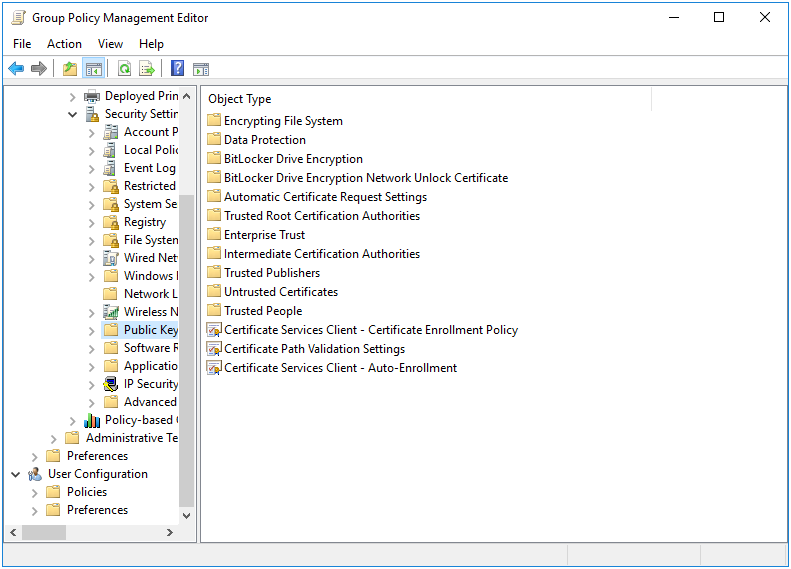
Figure 14.1: Public Key Policies
- Double click on and open the
Certificate Services Client - Auto-Enrollmentproperties.
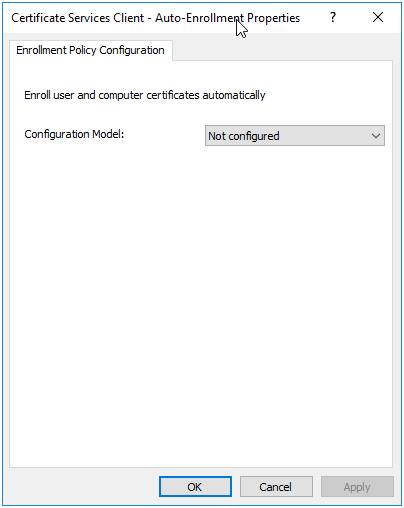
Figure 14.2: Certificate Services Client - Auto-Enrollment
- In the properties dialog, set the
Configuration Modelto “Enabled” and check the boxes to enableRenew expired certificates, update pending certificates, and remove revoked certificatesandUpdate certificates that use certificate templates.

Figure 14.3: Enable Certificate Auto-Enrollment
- Click “Apply” to apply the changes and “OK” to close the properties dialog.
This has enabled simple Certificate Auto Enrollment. Next lets configure advanced Certificate Auto Enrollment.
Advanced Certificate Auto Enrollment allows you to add multiple certificate servers to your configuration. This is useful in a more complex environment with multiple certificate servers, but is not necessary in a simple environment with a single certificate server. The advanced configuration stores the policy directly on the SYSVOL in the Registry.pol file, whereas a simple configuration is stored in LDAP.
To configure Advanced Certificate Auto Enrollment:
In the Group Policy Management Editor window, navigate to
Computer Configuration > Policies > Windows Settings >Security Settings > Public Key Policies.Double-click on “Certificate Services Client - Certificate Enrollment Policy” to open its properties.
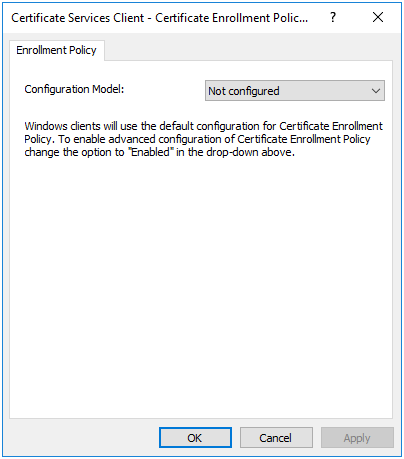
Figure 14.4: Certificate Services Client - Certificate Enrollment Policy
- Set the
Configuration Modelto Enabled. The default policy (configured previously in the “Certificate Services Client - Auto-Enrollment” properties) should already be listed under “Certificate enrollment policy list.” You can disable this policy if desired by unchecking the box next to the item in the list.

Figure 14.5: Certificate Services Client - Certificate Enrollment Policy: Enabled
- To add additional certificate servers for Certificate Auto Enrollment, click “Add…”
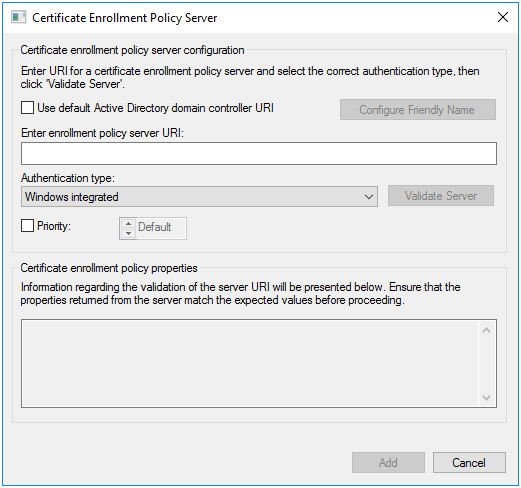
Figure 14.6: Add a Certificate Enrollment Policy Server
In the
Certificate Enrollment Policy Serverdialog, enter the enrollment policy server URI and set the authentication type. “Windows integrated” authentication refers to Kerberos authentication.You can set a priority for the policy, which determines the order in which the policy is applied to a client machine.
When finished, click “Add” and then “Apply” in the properties dialog. Click “OK” to close the dialog.
14.1.2 Certificate Templates
Certificate Templates instruct the client how to generate a certificate request for the Certificate Authority. These templates are configured using the Certification Authority utility included with the Remote Server Administration Tools (RSAT) found in Windows.
To create a certificate template:
- Open the
Certification Authorityutility, and click onCertificate Templatesin the tree.
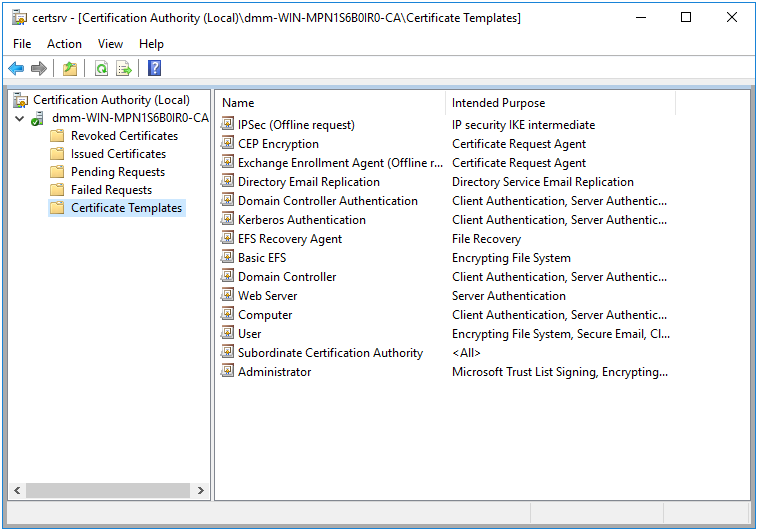
Figure 14.7: Certification Authority utility
Right click on
Certificates Templatesin the tree and selectManage.You’ll notice that there are a number of existing templates to choose from. Right click on one of the templates in the list, and click
Duplicate Template.
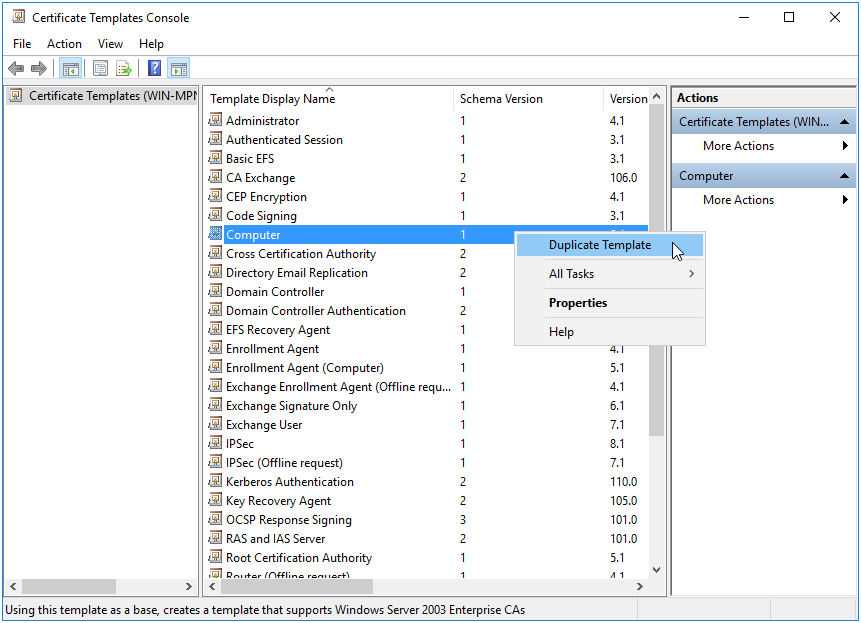
Figure 14.8: Certificate Templates Console
Switch to the
Generaltab, and set a name for your new template.Set the number of years the certificate will be valid and the renewal period.
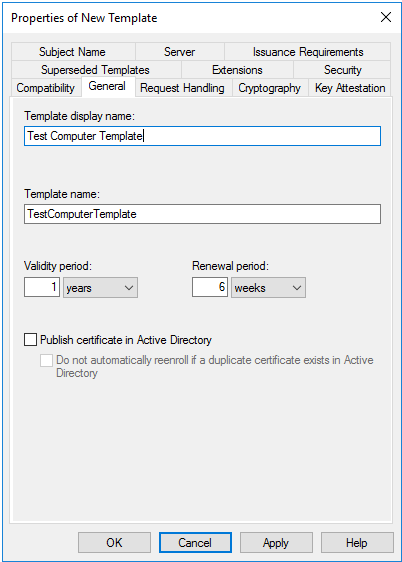
Figure 14.9: Template Properties
It may be useful to also review the
Cryptographytab and ensure the cryptographic requirements for the certificate will meet the needs of your organization.Apply and close the properties by clicking OK. Close the Certificate Templates Console
Next, to enable the new template, right click on
Certificate Templatesin the tree within the Certification Authority utility, and clickNew > Certificate Template to Issue.In the
Enable Certificate Templatesdialog, select the template we just created, and click OK.
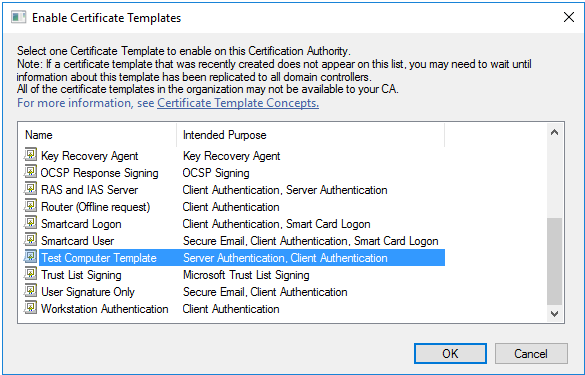
Figure 14.10: Enable Certificate Templates
Our new template is now enabled, and should be in the list of enabled templates in the Certification Authority utility.

Figure 14.11: Template Enabled
14.2 Client Side Extension
The Certificate Auto Enrollment Client Side Extension (CSE) will add new Certificate Authorities to certmonger, and automatically request to track new certificates based on the assigned Certificate Templates. This CSE requires that the certmonger and cepces packages be installed.
Certificates will be installed in /var/lib/samba/certs and private keys in /var/lib/samba/private/certs by default. It may be necessary to configure a symlink policy, as explained in chapter 10, in order to link to a more appropriate location for these files.
Let’s list the Resultant Set of Policy to view the Certificate Auto Enrollment policy we created in the previous sections.
> sudo /usr/sbin/samba-gpupdate --rsop
Resultant Set of Policy
Computer Policy

GPO: Default Domain Policy
=================================================================
  CSE: gp_cert_auto_enroll_ext
  -----------------------------------------------------------
    Policy Type: Auto Enrollment Policy
    -----------------------------------------------------------
    [ lizardo-WIN-QLIPDP2ISN7-CA ] =
      [ CA Certificate ] =
-----BEGIN CERTIFICATE-----
<REDACTED>
-----END CERTIFICATE-----
      [ Auto Enrollment Server ] = WIN-QLIPDP2ISN7.lizardo.suse.de
      [ Templates ] =
        [ Machine ]
        [ TestComputerTemplate ]
    -----------------------------------------------------------
  -----------------------------------------------------------
=================================================================
Notice that the new template we created in the previous section is listed under the templates. The Machine template is also listed. This is a default template enabled for joined computers (this template was named Computer in the list of enabled templates we saw previously).
Let’s now force an apply and observe the results.
> sudo /usr/sbin/samba-gpupdate --force
> sudo tdbdump /var/lib/samba/gpo.tdb -k "TESTSYSDM$" \
 | sed -r "s/\\\22/\"/g" | sed -r "s/\\\5C/\\\\/g" \
 | xmllint --xpath "//gp_ext[@name='Cryptography\\
                                    AutoEnrollment']" - \
 | xmllint --format -
<gp_ext name="Cryptography\\AutoEnrollment">
  <attribute name="bGl6YXJkby1XSU4tUUxJUERQMklTTjctQ0E=">
    {"files": [
      "/var/lib/samba/certs/lizardo-WIN-QLIPDP2ISN7-CA.crt",
      "/etc/pki/trust/anchors/lizardo-WIN-QLIPDP2ISN7-CA.crt",
      "/var/lib/samba/private/certs/
        lizardo-WIN-QLIPDP2ISN7-CA.Machine.key",
      "/var/lib/samba/certs/
        lizardo-WIN-QLIPDP2ISN7-CA.Machine.crt",
      "/var/lib/samba/private/certs/
        lizardo-WIN-QLIPDP2ISN7-CA.TestComputerTemplate.key",
      "/var/lib/samba/certs/
        lizardo-WIN-QLIPDP2ISN7-CA.TestComputerTemplate.crt"
      ],
    "templates": [
      "lizardo-WIN-QLIPDP2ISN7-CA.Machine",
      "lizardo-WIN-QLIPDP2ISN7-CA.TestComputerTemplate"
      ]
    }
  </attribute>
</gp_ext>
The log details show that a number of files were created. Let’s take a look at these files.
> sudo ls /var/lib/samba/certs/
lizardo-WIN-QLIPDP2ISN7-CA.crt
lizardo-WIN-QLIPDP2ISN7-CA.Machine.crt
lizardo-WIN-QLIPDP2ISN7-CA.TestComputerTemplate.crt
> sudo ls /var/lib/samba/private/certs/
lizardo-WIN-QLIPDP2ISN7-CA.Machine.key
lizardo-WIN-QLIPDP2ISN7-CA.TestComputerTemplate.key
> sudo ls /etc/pki/trust/anchors/
lizardo-WIN-QLIPDP2ISN7-CA.crt ->
  /var/lib/samba/certs/lizardo-WIN-QLIPDP2ISN7-CA.crt
The CSE download the root certificate from our CA (lizardo-WIN-QLIPDP2ISN7-CA.crt), and then linked it inside /etc/pki/trust/anchors. This is the system trust store. In addition to linking our CA root certificate to the trust store, the CSE also called the update-ca-certificates command to refresh the certificate store. Take a look at man update-ca-certificates for more details on how this works.
Now that we see our certificates have been installed, lets take a look at certmonger to see our CA and make sure our certificates are being auto-renewed.
> sudo getcert list-cas
CA 'lizardo-WIN-QLIPDP2ISN7-CA':
    is-default: no
    ca-type: EXTERNAL
    helper-location: /usr/libexec/certmonger/cepces-submit \
      --server=WIN-QLIPDP2ISN7.lizardo.suse.de \
      --auth=Kerberos
> sudo getcert list
Number of certificates and requests being tracked: 2.
Request ID 'lizardo-WIN-QLIPDP2ISN7-CA.Machine':
    status: MONITORING
    stuck: no
    key pair storage: type=FILE,
      location='/var/lib/samba/private/certs/
                lizardo-WIN-QLIPDP2ISN7-CA.Machine.key'
    certificate: type=FILE,
      location='/var/lib/samba/certs/
                lizardo-WIN-QLIPDP2ISN7-CA.Machine.crt'
    CA: lizardo-WIN-QLIPDP2ISN7-CA
    issuer: CN=lizardo-WIN-QLIPDP2ISN7-CA,
            DC=lizardo,DC=suse,DC=de
    subject: CN=testsysdm.lizardo.suse.de
    issued: 2022-12-08 12:57:35 MST
    expires: 2023-12-08 12:57:35 MST
    dns: testsysdm.lizardo.suse.de
    key usage: digitalSignature,keyEncipherment
    eku: id-kp-clientAuth,id-kp-serverAuth
    certificate template/profile: Machine
    profile: Machine
    pre-save command:
    post-save command:
    track: yes
    auto-renew: yes
Request ID 'lizardo-WIN-QLIPDP2ISN7-CA.TestComputerTemplate':
    status: MONITORING
    stuck: no
    key pair storage: type=FILE,
      location='/var/lib/samba/private/certs/
        lizardo-WIN-QLIPDP2ISN7-CA.TestComputerTemplate.key'
    certificate: type=FILE,
      location='/var/lib/samba/certs/
        lizardo-WIN-QLIPDP2ISN7-CA.TestComputerTemplate.crt'
    CA: lizardo-WIN-QLIPDP2ISN7-CA
    issuer: CN=lizardo-WIN-QLIPDP2ISN7-CA,
            DC=lizardo,DC=suse,DC=de
    subject:
    issued: 2022-12-08 12:57:35 MST
    expires: 2023-12-08 12:57:35 MST
    dns: testsysdm.lizardo.suse.de
    key usage: digitalSignature,keyEncipherment
    eku: id-kp-serverAuth,id-kp-clientAuth
    profile: TestComputerTemplate
    pre-save command:
    post-save command:
    track: yes
    auto-renew: yes
We see that certmonger is aware of our CA, and is tracking the template we created, and also the default Machine template. The status on your certificates should say MONITORING, as it does here. If not, then you’ll need to do some investigation to see why.
14.2.1 Trouble Shooting Certificates
If your certificates are not listed with a MONITORING status in getcert list, then you can start trouble shooting by rerunning sudo /usr/sbin/samba-gpupdate --force. Look for any errors in the output that could indicate what caused the problem. For example, a common error you’ll encounter is Failed to fetch the list of supported templates. This error comes with a detailed backtrace. Look for the Caused by message.
14.2.1.1 Certificate doesn’t match
This particular error happens when Internet Information Services (IIS) has the wrong root certificate selected.
(Caused by
  SSLError(
    CertificateError(
      "hostname \'win-qlipdp2isn7.lizardo.suse.de\' doesn\'t
      match \'lizardo-WIN-QLIPDP2ISN7-CA\'"
    )
  )
)
To resolve this error, open the IIS Manager, select the Default Web Site in the tree, then click Bindings in the right side Actions pane.
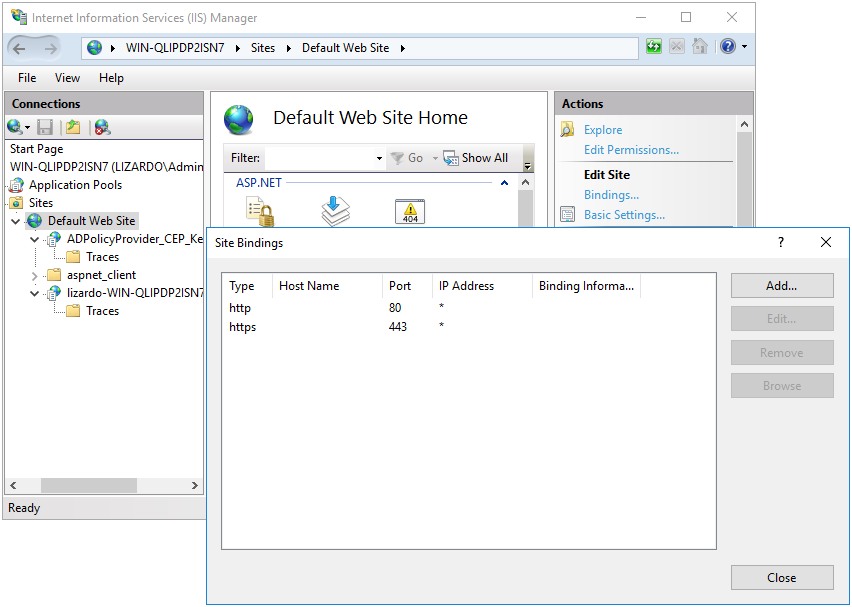
Figure 14.12: IIS Manager
Highlight the https binding, then select Edit.... Select the correct SSL certificate, then click OK to save.
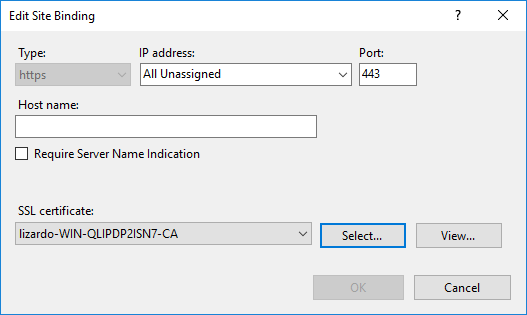
Figure 14.13: Edit Site Binding
14.2.1.2 python-requests security level
Another error you may encounter is actually specific to the python-requests module.
(Caused by
  SSLError(
    SSLError(1,
      '[SSL: DH_KEY_TOO_SMALL] dh key too small (_ssl.c:852)'
    ),
  )
)
This DH_KEY_TOO_SMALL error is caused by a default security level change in python-requests. You can work around this error by setting openssl_seclevel=1 in the global section of your cepces.conf.
14.2.1.3 Checking request failures
If the CA failed to issue a certificate when the template request was sent, we can check the Certification Authority utility to see why a request was rejected. If you click in the tree, there are lists of Failed Requests, Pending Requests, Issued Certificates, and Revoked Certificates. If your request failed for some reason, it may show up under Failed Requests, for example.
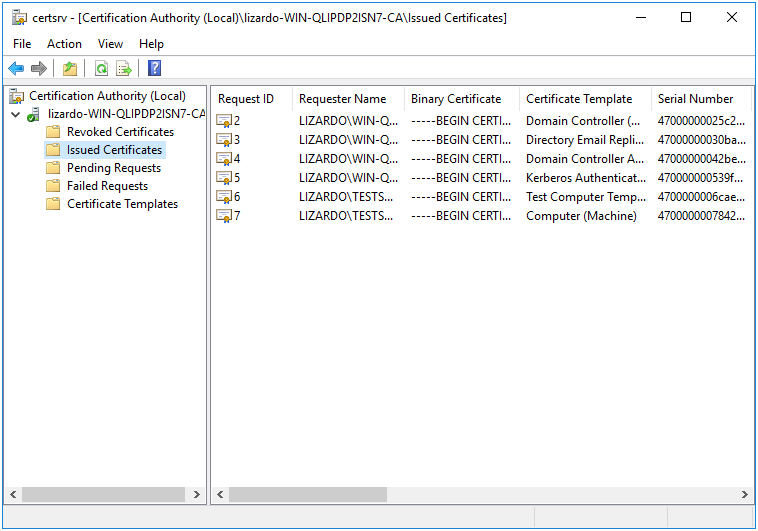
Figure 14.14: Issued Certificates
You can see, for example, in the Issued Certificates list, that the certificates we are monitoring on our test machine are listed here (the two most recent requests).
14.2.1.4 Examining logs
Check the logs to track down other issues. The cepces plugin logs to /var/log/cepces/cepces.log by default. Check the handler_fileHandler section of /etc/cepces/logging.conf for the exact location of the log. Additionally, some errors may end up in the certmonger logs, instead of cepces. You can check journalctl -xe -t certmonger for certmonger messages.